Pay in installments of $5.32 with
![]() ,
,
![]() and
and
![]()
Shipping Estimate
USA
- USA
- CAN
- USA
- CAN
Ships within 48 hours · Estimated delivery Jun 29 - Jul 4
For Your Every Summer RSVP, with Code: SUMMER15
Description
bathtub tent floor Tub floor – YAMA Mountain GearWe have retired this product to focus on our core products. We hope to bring it out of retirement someday. Description Increase the storm worthiness of your tarp setup with a clip in tub floor. Extensions at the head and foot provide extra splash protection and drape out of the way when not needed. For the simplest setup, clip the top four corners to your tarp using shock cord and mitten hooks. This suspends the top of the tub and allows the floor to
We have retired this product to focus on our core products. We hope to bring it out of retirement someday.
Description
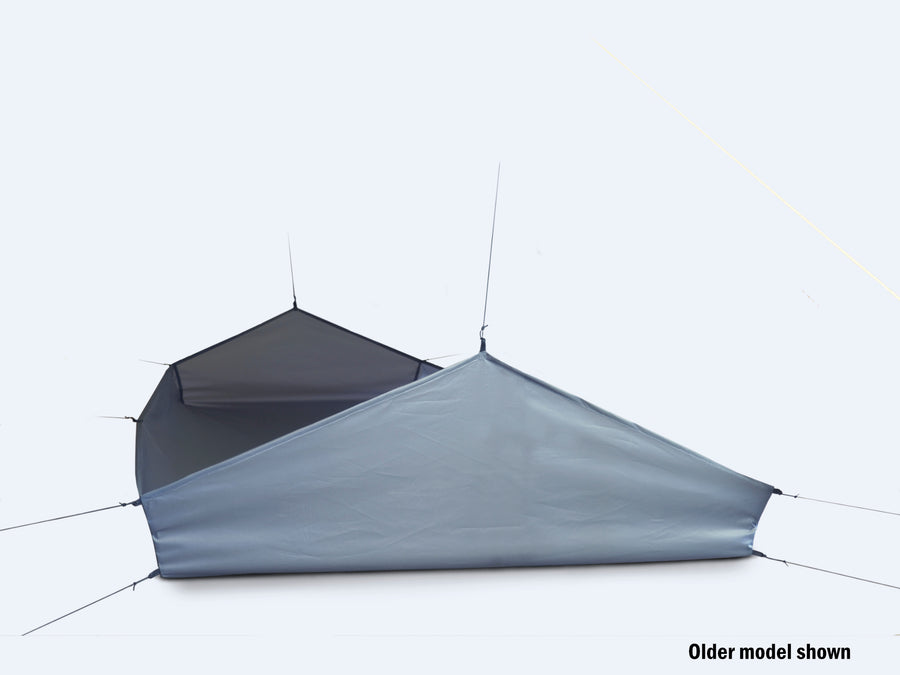
Increase the storm worthiness of your tarp setup with a clip-in tub floor. Extensions at the head and foot provide extra splash protection and drape out of the way when not needed.
For the simplest setup, clip the top four corners to your tarp using shock cord and mitten hooks. This suspends the top of the tub and allows the floor to hang. Deploy the head and foot extensions by clipping them to your tarp above, and for serious weather, clip the sides up to the center of your tarp's ridgeline. For extra security in windy environments, clip out or stake the bottom corners of the tub.
The floor partners well with our Cirriform tarps, tapered tarps, rectangular tarps*, and many other a-frame style tarps. For a more minimalist tub, please see our Simple Tub.
*when pitched with an a-frame structure
Made in the USA from imported materials.
Specifications
Dimensions:
- Length: 84" | 213cm
- Head width: 40" | 102cm
- Foot width: 30" | 76cm
- Tub height: 6" | 15cm
- Height of front extension: 20" | 51cm
- Height of rear extension: 15" | 38cm
Material:
Available in 20D or 40D Silpoly
- Hydrostatic head for 20D: >4500mm
- Hydrostatic head for 40D: ~2000mm
Weight:
- 20D Silpoly: 5.2 oz | 148g
- 40D Silpoly: 7.7 oz | 219g
- Note: You may wish to seal the seams at the corners of the tub.
Rigging
Overview
For most users, we recommend installing shock cord at each of the four upper tub corners, at the midpoints along each long side, and at the extensions at the head and foot. Clipping the upper corners out to your tarp's corners will allow the floor to hang. To help keep the tub more secure in the wind, some users may wish to install additional cord at the tub's lower corners. These cords then get clipped out to the tarp's stakes (alternate: stake the four lower corners directly to the ground).
Optional Rigging Kits
Rigging kits are available for connecting your floor to your tarp. Four options are offered.
- Options A & C include Tensionlocks. These install at the corners and make for easy adjustment of your cord lengths. They are most useful if you expect to pitch your tarp at varying widths.
- Options A & B contain less shockcord and are sized to work well with the 1P Cirriform Tarp.
- Options C & D contain more shockcord and are better suited for use with larger tarps.
| Rigging Set | Length of 1/16" shockcord | # Tensionlocks | # Mitten hooks | # Cordlocks | Weight | Price |
|---|---|---|---|---|---|---|
| A | 14 ft | 4 | 8 | 3 | 0.8 oz | 23g | $5.79 |
| B | 14 ft | 0 | 8 | 3 | 0.7 oz | 19g | $5.54 |
| C | 25 ft | 4 | 8 | 3 | 1.1 oz | 31g | $6.84 |
| D | 25 ft | 0 | 8 | 3 | 0.9 oz | 26g | $6.60 |
1 - Determine cord lengths
For pitching with a 1P Cirriform, see our length recommendations in the diagram below. Otherwise, use this method:
- Pitch your tarp (err on the wider & higher side) and lay the floor out about where you'd like it positioned.
- Run some shock cord from a front corner to the associated corner of the tarp. The cord should be taut, but not stretched. Cut two cords at this length (one for each front corner).
- Repeat for the rear corners.
- Repeat for one of the midpoints.
- For the extension at the head end, measure the distance from the head end of the floor (at ground level) to a hang loop above and subtract ~15" (38cm).
- For the extension at the foot end, measure the distance from the foot end of the floor (at ground level) to a hang loop above and subtract ~10" (25cm).
- After installing the rigging and pitching the floor, determine the length for the remaining midpoint by running the cord from the midpoint, through a hang loop above, and to the cord attached to the opposite side.
2 - Install the rigging at the corners (if not using tensioners)
- Cut the shock cord to length (see above).
- Tie a mitten hook to the end of each cord. We like to use a clinch knot.
- Tie a loop in the other end of the cord. We like like to use an overhand loop knot.
- Attach the cords to the tub's corners using a girth hitch (excluding the longer cord at one of the midpoints).
2 - Install the rigging at the corners (if using tensioners)
- Cut the shock cord to length (see above).
- Tie a mitten hook to the end of each cord. We like to use a clinch knot.
- Using a girth hitch, install a tensioner on the elastic loop at each of the tub's upper corners (see photo sequence below).
- Thread the untied end of the shockcord through the tensioner as shown (first through the middle opening from bottom to top, then through the remaining hole from top to bottom).
- Tie a loop in the untied end of the cord. We like like to use an overhand loop knot.
- Repeat at each corner
3 - Install the rigging at the head & foot extensions
- Cut the shock cord to length (see above).
- Tie a mitten hook to the end of each cord. We like to use a clinch knot.
- Pass the untied end of the shockcord through the webbing loop.
- Thread the untied end of the shockcord through a cordlock.
- Tie a loop in the untied end of the cord. We like like to use an overhand loop knot.
- Repeat at the other extension.
4 - Midpoints
- Cut the shock cord to length (see above). You will have one short cord and one long cord.
- Tie a mitten hook to the end of each cord. We like to use a clinch knot.
- On the short cord, tie a loop and the other end, and install it at one of the midpoints as done in Step 2 (non-tensioner method).
- Take the longer cord and pass the untied end between the webbing and the floor as shown in the photo (not through the top part of the loop).
- Thread the cord through the cord lock, then tie a loop in the end.
Tips
- If you find that your cords are slack, or the tub's walls not pulled taut for your widest pitches, trim your cords (or tension them, if using tensioners).
- For narrower tarp pitches, take up slack in the cords using one of these methods:
- Double over the cord by running it through the tarp's tie-out and then clipping it back to the tub.
- Tie a loop along the length of your cord. Clip the mitten hook to the loop, then clip it to the tarp's tie-out (eg. to make a 30" cord have an effective length of 20", tie a loop 10" from the mitten hook).
- To raise the sides, cinch the cords attached to the midpoints using the cordlock.
- For additional stability in the wind, either stake the bottom corners to the ground, or run cords from the bottom corners to your tarp's stakes.
Shipping Notes
- Free Standard Shipping on $100+ Orders to the USA.
- Except Preorder products are shipped in 48 hours.
- Delivery to the USA:
- Standard Shipping : 3-10 business days
- If time is of the essence, please consider selecting expedited delivery for faster service.
Exchange/Return Notes
- We offer a 30-day return/exchange service after receiving.
- Final sale items are not eligible for returns or exchanges.
- To process your return/exchange, please contact us at [email protected]
- Please click here for more details>>> Return & Exchange Policy